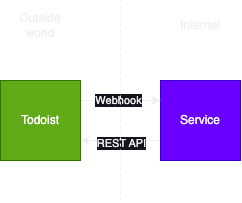
💪 Todoist On Steroids was a hobby project to create a ✅ Todoist integration using their webhooks and APIs to automate follow-ups of tasks. From a high-level point of view, the architecture looks something like this:
 During the implementation, all testing was done manually. This is fine for a quick and dirty 1-off script, but anything more serious than that requires automated testing. This article focuses on integration testing, meaning the service as a whole is considered the system under test. If you are interested in testing and testing strategies, more information can be found in ✔️ Software Testing.
The full source code can be found on GitHub.
Integration testing with Spring Boot
As mentioned before, the microservice is the system under test in the context of integration testing. This means that:
- The service should be considered a black box and any interaction is done through the externally available APIs
- The service should not rely on any external dependencies, such as the Todoist API.
Spring Boot offers a solution for the first point. Starting up the service and interacting with its APIs in tests is incredibly easy as Spring Boot has out-of-the-box support for writing tests with the standard JUnit5 testing library.
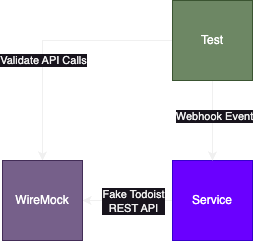
The second point requires an additional tool such as WireMock. This tool can be used to easily fake the behaviour of the external dependency and also allows you to verify that the interaction with the outside system is correct.
This leads to the following testing structure

WireMock setup
The general setup for WireMock requires:
- Creating a server using the
WireMockServer()constructor - Starting the server using
wireMockServer.start() - Resetting requests using
wireMockServer.resetRequests() - Stopping the server when all tests have been executed using
wireMockServer.stop()
This results in the following setup (using JUnit annotations):
class MainTest {
    val wireMockServer = WireMockServer(options().port(8080))

    @BeforeAll
    fun beforeAll() {
        wireMockServer.start()
    }

    @AfterAll
    fun afterAll() {
        wireMockServer.stop()
    }

    @BeforeEach
    fun beforeEach() {
        wireMockServer.resetRequests()
    }
Define behaviour
Then the behaviour of the external services must be defined. This depends on the system under test, which in this case is defined in [this] file. The system performs 2 API calls:
/sync/v9/items/getto get items from Todoist/sync/v9/syncto update an item in Todoist
WireMock works by starting a server and defining the responses for each external API call. In case of a GET request, you have to define upfront what data will be returned.
An example of the setup code for this specific project:
class MainTest {
    @BeforeAll
    fun beforeAll() {
        val mapper = ObjectMapper()
        val response = GetItemResponse(
            ancestors = listOf(
                Item("Parent ID", null, null, "Project ID", listOf())
            ),
            Item("Item ID", "Parent ID", null, "Project ID", listOf())
        )
        wireMockServer.stubFor(
            post("/sync/v9/items/get")
                .willReturn(okJson(mapper.writeValueAsString(response)))
        )
        wireMockServer.stubFor(
            post("/sync/v9/sync")
                .willReturn(ok())
        )
    }
}
Full example
Combining everything results in the following code (source code):
package todoist

import com.fasterxml.jackson.databind.ObjectMapper
import com.github.tomakehurst.wiremock.WireMockServer
import com.github.tomakehurst.wiremock.client.WireMock.*
import com.github.tomakehurst.wiremock.core.WireMockConfiguration.options
import org.assertj.core.api.Assertions.assertThat
import org.junit.jupiter.api.*
import org.springframework.boot.test.context.SpringBootTest
import org.springframework.boot.test.web.server.LocalServerPort
import org.springframework.http.HttpStatus
import org.springframework.web.client.RestTemplate

@SpringBootTest(
    classes = [DemoApplication::class],
    webEnvironment = SpringBootTest.WebEnvironment.RANDOM_PORT
)
@TestInstance(TestInstance.Lifecycle.PER_CLASS)
class MainTest {
    @LocalServerPort
    var port = 0

    val wireMockServer = WireMockServer(options().port(8080))

    @BeforeAll
    fun beforeAll() {
        wireMockServer.start()

        val mapper = ObjectMapper()
        val response = GetItemResponse(
            ancestors = listOf(
                Item("Parent ID", null, null, "Project ID", listOf())
            ),
            Item("Item ID", "Parent ID", null, "Project ID", listOf())
        )
        wireMockServer.stubFor(
            post("/sync/v9/items/get")
                .willReturn(okJson(mapper.writeValueAsString(response)))
        )
        wireMockServer.stubFor(
            post("/sync/v9/sync")
                .willReturn(ok())
        )
    }

    @AfterAll
    fun afterAll() {
        wireMockServer.stop()
    }

    @BeforeEach
    fun beforeEach() {
        wireMockServer.resetRequests()
    }

    @Test
    fun `Event without follow-up label is ignored`() {
        // Given
        val event = TodoistEvent(
            event_data = Item(
                id = "Test ID",
                parent_id = null,
                section_id = null,
                project_id = "Test Project ID",
                labels = listOf()
            )
        )

        // When
        val response = RestTemplate().postForEntity(
            "http://localhost:$port/webhookEvent",
            event,
            String::class.java
        )

        // Then
        assertThat(response.statusCode).isEqualTo(HttpStatus.OK)

        wireMockServer.verify(0, postRequestedFor(urlEqualTo("/sync/v9/sync")))
    }

    @Test
    fun `Follow-up item with parent is updated after completion`() {
        // Given
        val event = TodoistEvent(
            event_data = Item(
                id = "Test ID",
                parent_id = "Parent ID",
                section_id = null,
                project_id = "Test Project ID",
                labels = listOf("follow-up")
            )
        )

        // When
        val response = RestTemplate().postForEntity(
            "http://localhost:$port/webhookEvent",
            event,
            String::class.java
        )

        // Then
        assertThat(response.statusCode).isEqualTo(HttpStatus.OK)

        wireMockServer.verify(1, postRequestedFor(urlEqualTo("/sync/v9/sync")))
        wireMockServer.verify(
            postRequestedFor(urlEqualTo("/sync/v9/sync"))
                .withHeader("Authorization", containing("Bearer"))
        )
        wireMockServer.verify(
            postRequestedFor(urlEqualTo("/sync/v9/sync")).withRequestBody(containing("item_move"))
        )
        wireMockServer.verify(
            postRequestedFor(urlEqualTo("/sync/v9/sync")).withRequestBody(containing("item_update"))
        )
        wireMockServer.verify(
            postRequestedFor(urlEqualTo("/sync/v9/sync")).withRequestBody(containing("item_uncomplete"))
        )
    }
}
Using Wiremock requires making the Todoist URL from the previous article to be configurable. This can easily be achieved by using test override properties and updating the WebClientProvider to:
@Component
class WebClientProvider {
    @Value("\${todoist.api.key}")
    val apiKey: String? = null

    @Value("\${todoist.url}")
    lateinit var todoistUrl: String

    fun createSyncClient(): WebClient {
        return WebClient.builder()
            .baseUrl("$todoistUrl/sync/v9")
            .defaultHeader("Authorization", "Bearer $apiKey")
            .defaultHeader("Content-Type", "application/x-www-form-urlencoded")
            .build()
    }
}
The full source code of this project can be found here.
Test outcomes
In the second test, you might be inclined to also check that the system under test fetches the item details. Although it wouldn’t be incorrect, you could consider this as an implementation detail. Testing implementation details can cause tests to become brittle and require additional refactoring when changing the code.
It might be tricky to differentiate because it looks identical to verifying that the sync API is called. A rule of thumb is that you shouldn’t verify all types of interaction, but the interactions that change the state of the outside world. Getting additional information does not change the outside world, but un-completing/moving/updating an item does.
I could probably write a whole other article just on the principles of testing, but that is for another article.
Conclusion
Because I want to continue working on the hobby project using the Todoist APIs, it makes sense to introduce automated tests. As the article by Spotify points out, it makes more sense to focus on integration tests than on unit tests. As a result, I have implemented a couple of tests to show how easily this can be done with Spring Boot in combination with Wiremock.